Showing posts with label Bulkheads. Show all posts

Sunday, February 14, 2021

Finished the baggage bulkhead - 5 hours

 I started off the build session by fitting the lower bulkhead to the upper bulkhead and drilling the holes for the #8 screws and the associated nutplates.


I then began the process of drilling ALL of the #8 holes for the require nutplates. I marked out guide lines as best I could so that the nutplates followed the lines of the bulkhead.


Then came the very tedious process of countersinking and riveting all of the nutplates. I prime all of my nutplates so there is a bit of time eaten up by prep and paint of these.


The top skin went back on as I will need to fit the F-6111 aft skin reinforcing ribs.


Saturday, February 13, 2021

Fitting the baggage bulkhead - 6 hours

 I still have a few rivets that I need to finish on the lower center part of the F-706 bulkhead. I was dragging my heels a bit on completing this task. It’s a tricky spot and in my head I was building it to be more difficult than it turned out. 


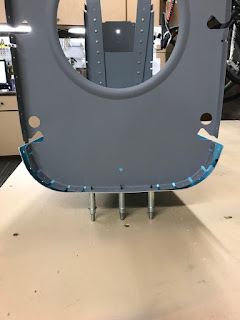
Now I am ready to complete the fitting of the Baggage bulkhead panels. I took some time to confirm everything is nice, square and level. Lots of checking and adjustment but I was finally able to commit to drilling all holes in the lower panel.

Now I need to fit the upper panel. First I need to trace the required radius. I drew the radius on AutoCAD, printed out a template and then traced the radius onto the upper bulkhead.

Once cut, I measured out the openings for the seat belt cables and drilled the holes. Then i flipped the bulkhead over and measured out all of the upper mounting holes. Took some time to finish the seat belt cable openings and other little details.


I then fitted the upper bulkhead to the assembly and drilled all mounting holes. 


Monday, February 8, 2021

Started fitting the Baggage Bulkhead - 2.5 hours

I am ready to start fitting the F-751 baggage bulkhead. I cleco'd in the baggage floors and baggage side covers and celco's in the baggage bulkhead. I started checking the fit, making sure all was sitting correctly. 


I wasn't loving the fit...the holes along the F-728A bellcrank channel sit just a bit inboard toward the vertex of the channel, as well I want to make sure the bulkhead is sitting level at the top. A few things may help my cause. I still have some riveting to do at the bottom of the bellcrank channel. As well I still need to install the nutplates for the baggage bulkhead along the bottom of the F-706 bulkhead.


Sunday, January 31, 2021

Riveted the F-728B angle and fitted the bellcrank - 1 hour

 Using my pneumatic alligator squeezer, setting all of the rivets in the F-728B angle was a breeze. Accessibility of the lower most 3-4 rivets was a bit tough as expected but I managed to set all of the rivets with no issues.


I then fit the bellcrank assembly. Perfect! I did notice thought that the bolt slips in place much better going from the right side to the left, rather than the left going right. I still have to set that top missing rivet...I'll wait until I get the baggage floors and top skin fitted to make sure alignment is good.


Saturday, January 30, 2021

Riveting the F-728A Channel to F-706 bulkhead - 1 hour

 The instructions have you finish off the bellcrank support. When riveting the fuselage skins, I preemptively riveted the bottom of the F-728A bellcrank channel to the bottom skin. Not entirely ideal, but I don't think this is too big an issue as it just makes riveting of the F-728B angle a bit more tricky. 

So not that I am commented to my setup. I drilled the F-728A channel to the F-706 Bulkhead. Dimpled the holes for AN426AD4 rivets and then bucked the rivets.


Sunday, January 24, 2021

Riveting the Aft Deck/F-709 Bulkhead and drilling Shoulder Harness Anchors - 4.5 hours

 Spent the morning riveting the aft deck to the fuselage. Used a combination of bucking and squeezing. Took some time but I eventually got there.


 Now I am ready to fit and rivet the F-709 bulkhead to the aft deck. Bit of head scratching to figure out how to place the factory rivet head to the aft so it looks good. I ended up using my super long rivet set which does and excellent job of riveting.

Now I am ready to start the initial fitment of the F-775 rear top skin. This allows me to mark the appropriate holes on the F-709 bulkhead enough to give me an idea of where I need to flute.


Still on a bit of a roll. I moved on to the F-636 Shoulder Harness Anchors. After careful marking and placement I drilled the holes slightly undersized and then finished with the reamer. 


Friday, August 16, 2019

More dimpling, more edge prep on center section - 8 hours

So one of the items that is weighing heavy on my mind is how to attach the baggage floors to the F-706 bulkhead. With a little bit of research the baggage floors will need to attach with #8 screws, however they will need to be flush mounted to allow the F-751 baggage bulkhead to sit properly.

Countersinking the bulkhead for the #8 screws concerns me. I just had the one baggage floor crack on me, which is easily replaced however if I have the same issue on the F-706 bulkhead after its installed it will be devastating to me. To make matters worse, one hole on the bulkhead is through 2-layers. I really wish I had done this back during the F-706 bulkhead assembly.

I was determined to solve this sooner than later. So first step I removed the primer from the holes in question on the bulkhead. This will allow me to lube then dies when dimpling. Next I opened the factory holes to #19 using a MDF backing block and stepping up drill bit sizes. I then carefully polished the holes with #600 grit paper on the dremel mandrel and buffed the holes with 3M maroon scotchbrite.

I then lubed the dies and material, took a deep breath and started to dimple. Thankfully all dimples turned out perfect, including the ones through the double layer of the bulkhead.


Feeling good from dimpling the #8 screws, I dimpled the #40 holes on the seat and baggage ribs.

Next was the very long and tedious process of deburring the corners, nooks and crannies. Went through a lot of 3M maroon scotchbrite squares on the dremmel but the job is done and done well.


Saturday, April 20, 2019

Monday, April 8, 2019

Further fitting of the F-712 and F-711 bulkheads - 8 hours

Very long and annoying day in the garage these last few days. I've been spending a few hours an evening messing with the fitment of the F-712 and F-711 bulkheads to the F-779 skin. Lots and Lots of fussing. Its quite a process to get things tweaked to finally be able to get them fully clecoed to the bottom tail skin. I won't sugar coat it, the process is extremely frustrating and I've lost a bit of sleep thinking about if I've done something wrong, or if I might be wrecking things. Once I was able to get the fit decent I then clecoed it to the aft fuselage and soon realized....I need to work the bulkhead tabs some more. ugh.


A good look of how I still need to tweek the fit so the bulkheads align better with the fuselage sides.


Sunday, March 31, 2019

Started initial fitting of the Aft Fusalage - 5 hours

One of the items that I didn't fully complete was finish cutting the J-stiffeners. It's not entirely clear from the plans and manual if J-stiffeners cut trimmed on each ends. Also, I'm leery to cut the J-stiffeners to length as per the plans or should I be leaving them long for best bit. Once I started lining things up, I could see that I did in fact need to trim both ends of A,B, and C stiffeners per the detail on the plans and also that the length stated on the plans is bang on.

Update - For the notch that gets cut into the ends of the J-Stiffners (as detailed on the plans), Notch both ends of the two longest stiffeners. The shortest J-Stiffener that goes on the top only gets notched on one end. Really, in order to assembly the aft fuselage you only need to cut and notch the two sets of longest J-channels. So you can always leave the 3rd (short) set till much later.

After marking the ends per the plans, I rough cut them on the band saw and then using the 3M wheel they were easily shaped to final form.

Next I began a lose fit of the F-712,  F-711 and F-710 bulkheads to the F-779 tail bottom skin. I knew from reading the various blogs that the bottom skin needed some TLC to fit the bulkheads better. It was easy to see how off it is.


I could also see how I needed to angle the flanges on the bulkhead. Yup, lots of adjustment needed.

I decided to hand bend the F-779 bottom skin, I took my time and slowly worked at it.


I finished up the day with clecoing the Aft fuselage to check fit.