Tuesday, September 20, 2016

Match drilled and deburred Ailerons - 4 hours

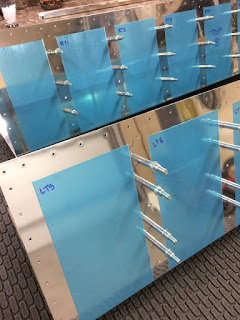
Pickup where I left off yesterday, I match drilled all the stiffeners to the aileron skins. But the part that I am dreading is the deburring of the skins and stiffeners. A very slow and painful process....I plugged away. Again, Netflix to the rescue to help pass the time. After some time it was all done, and then before dimpling I scuffed everything up with scotchbrite.

I then started dimpling the stiffeners

One little slip up with the pneumatic squeezer resulted in a bad dimple....I will need to replace one stiffener. Doh!!!

Monday, September 19, 2016

Preping the Aileron skins - 3 hours

I'm battling with motivation to build as work is so busy and I have a lot of yard work to do. I managed to get myself working on the Ailerons. First I need to devinyl the aileron skins. Mindless work, but it past quickly thanks to Netflix.

Then I was able to mark and cleco the stiffeners to the skins.


Monday, September 12, 2016

Initial fitting the pitot mast - 3.5 hours

I was finally ready to begin fitting the pitot mast. I had already settled on a SafeAir 1 mast some time ago and had purchased one. over the last few months I was deciding on where to put it. Considering I need a heater pitot, I need to make sure there is room for the heat controller. I finally settled on a position between two ribs outboard of the aileron bellcrank. The tricky part will be to build a support stiffener to help secure the mast between the two ribs as the wing skin is pretty thin at that area.
I began playing with the fit on the spar.


Looks like I will have to watch the clearance with the spar rivets.


Now at this point I could see how things were going to work out. More in terms of the rivet lines. One thing that I wanted to do was have the horizontal rivet line, in line with the rib/skin rivets. 
Another item of concern was making sure that the ribs were going to be in the right place to make the stiffener. My solution was to make a template based on the skin. I took a piece of scrap and similar to the method used in the spar doubler, I match drilled the rivet holes from the skin.


Now that I had the correct placement of the rib holes, I now could ensure that my rivet line going across would line up with the rib rivets.


Here it is fit into place.


 I was sure to check, check and re-check that the mast center line was correct and perpendicular with the spar.

 
 No, I needed to place the mast, so I needed to cut a template to trace onto the scrap. I didn't want to use the paper template just yet, so I used a piece of cardboard.


 It makes a perfect outline when you press the mast on it.

Now that I had the outline, I could trace it onto the scrap piece and find the correct fit/location.

It sits a little forward as the mast frame makes contact with the spar/skin rivets. I may need to either move the mast back slightly, or simply remove a little material from the mast plate to clear the spar rivet shop heads


I haven't drilled the spar holes into the pitot mast just yet, and I'm thinking on when its best to drill those holes.

Fitted Aileron and flap braces- 4 hours

Next step needed was to fit the aileron and aileron and flap braces to the wings. I figured that this would be a very quick step, but after initial fitting it was clear that I had to file down some edges as the pieces wouldn't fit.

Here the aileron brace interferes with the left wing aileron bracket.

 I took out the file and went to work.

The right side is very close too, so I filed it down.


The left wing flap brace needs a little bit of tailoring to fit with the spar doubler.

All good to go to start match drilling holes.

Sunday, September 11, 2016

Riveted the Aileron Hinges to the Wings - 6 hours

I was battling between wanting to get the aileron hinges on and holding off. I do not like setting rivets through thick material purely because if you mess up, it's murder getting them out. I finally worked up the nerve to give it a go.


I used the gun and bar on the inboard hinge. Everything was going well. I used the pneumatic squeezer to set most of the rivets on the outboard hinge.


And then the other wing.


And then disaster stuck. I notice on the first wing that I had mashed the factory head on one of the rivets with the rivet set. It happened because there is very tight clearance between the shop head of the one rivet and the rivet set. So ultimately I choose to drill out the rivet and try it again. So drilled of the head, and do you think it would punch out....heck no. So I had to drill it out. this ended up with not a perfect hole...not bad, but not perfect. Tried to set another rivet, but it folded over. Crap...Here we go. Again, drilling off the head, it wouldn't punch out. Had to drill it. this time the hole was just not right....sigh. I have to go to an AN5 rivet. So I drilled it and then tried to buck the AN5 rivet. And it began to fold....CRAP. so I stopped. Of course I noticed that I put a smiley in the work. Oh man this is going downhill fast. So, I dug out my dremel with the buffing wheel and tried to smooth out the smiley. I then spot primed the area. Dug out the alligator squeezer and tried to set another AN5 rivet. It set....not perfect, but good enough. This was a very stinging experience and my stomach was a bit in my throat.


I sent pictures to an AME friend and he agreed, its not perfect but it will do just fine.
Ahh...Tough day in the shop!!

Saturday, September 10, 2016

Preped Aileron Parts - 5 hours

Big day of little progress. I cleaned up all the edges of the Aileron stiffeners, ribs, spar and the flap and aileron braces. Lots of work to be done. I started on the stiffeners first and ran them through the sanding station with 120grit paper to get them to the right size.  Next I ran them through the 3Mwheel and they turned out perfect. There is a lot of stiffeners so it takes time.

Next I used the file to break all the edges of the braces, ribs and spars by sliding it along the edge and eventually evening out the edge. I used a round file to even out the round lightening holes. It goes fairly quick, but it leaves sharp edges. So a quick run through with the 3m wheels makes them smooth. Again...sounds quick, but in actuality, lots of time was spend on them.

Friday, September 9, 2016

Finished the right flap - 6 hours

I dove into the right flap feeling confident that I had the knack, and boy was I flying. Again, had the odd rivet to drill out..maybe 2 in all if my memory serves me. It was very easy to reach all the rivets with that thin tungsten bucking bar. Again, the fact that the one end is taped up really saved the day and helped greatly with setting the rivets straight.


Unfortunately I really had some difficulties squeezing the rivets in the end rib. They just wanted to fold over (even when the length was correct). I was using the no-hole yoke and I have to say from past experience, it can be temperamental. Some days it sets just fine, other days not so much. Today it wasn't working well. I had to drill out and re-set a bunch of them, only one hole (top side at the very bottom) I had to drill out a couple times, and ultimately I decided to use an MK-319-BS rivet, which is a tad annoying cause on the left flap I actually was able to set a solid rivet there. 

Wednesday, September 7, 2016

Completed left flap - 3 hours

Now that I have some rhythm to bucking the flap rivets, I managed to crank out the bottom side of the left wing in no time. Everything went extremely well, again only had to drill out the odd rivet and re-try. 


But, just as I was nearing the finish line setting the last couple of rivets, wouldn't you know I let the gun slip and I've put a dent in the bottom of the flap skin. Ahh, stings. It's not structural, just cosmetic....but still not what I wanted. A little super-fill from aircraft spruce and primer and all will be just fine in the end.

I finished off the flap by using the squeezer on the end rib rivets and I was done.