Sunday, April 28, 2019

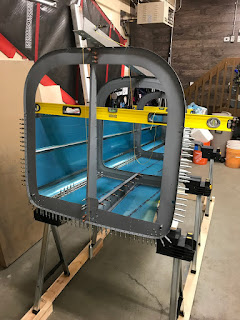
Started Riveting the Aft Fuse - 2 hours

Spend a very small amount of time on the build. I started the riveting process. I'm dreading this as I have not really riveted in quite some time.


Saturday, April 27, 2019

Began assembly of the aft fuselage - 5 hours

Nice big day in the garage today. I started the fuselage assembly with riveting both the F-729B angle and the autopilot servo mounting bracket on the F-729 rib. Rather than squeeze the rivets, I opted to start the set with hand bucking them and then finish with the squeezer. I find that the result is much better and consistent set rivets as the AN470 rivets tend to slump if your not careful about being perfectly centred on the rivet head. The setup for clamping takes some time.


Next I began the long tedious process of cleco'ing the aft fuselage together...Again.


much of the time is taken on trying to get the fuselage perfectly straight.


Thursday, April 25, 2019

Primed the exterior mating surfaces onf the Aft Fuselage Skins - 2 hours

Spent a little bit of time priming the mating surfaces on the outside of the fuselage skins. To determine how much to prime, I temporarly clecoed the two pieces together and marked the piece with a sharpie. Then I knew where to mask off. A wipe with MEK, then scuff with maroon scotchbrite and wipe with MEK and then prime.
Only the bottom skins get a little TLC. There is no extra exterior priming on the side skins.

Some closeups for reference.


Wednesday, April 24, 2019

Debur, Prep, Dimple and Prime Aft Fuselage - 6 hours

Not much in the way of pictures, It’s taken me a couple of evenings to disassemble, debur all the holes (This took some time as a few of the holes gave me some trouble...The F-711 bulkhead holes that were extremely difficult to cleco and a few holes had some nasty burrs) it takes a little extra care to debur. A few holes I buffed with some maroon scotchbrite. Next I broke all the edges with a file and smoothed them with the 3m wheel. I worked the edges that overlap other skins with the edge forming tool. After that I dimpled all the holes with the exception of the F-706 bulkhead holes and the two holes for the rudder stop.

Lastly everything was scrubbed with maroon scotchbrite. Degrease wipe, MEK wipe, Acid wash with Cleanbrite, another MEK wipe and finally prime.


Saturday, April 20, 2019

Friday, April 19, 2019

Installed the Autopilot Pitch Servo - 5 hours

One last thing I needed to do before disassembling the aft fuselage was to install the autopilot pitch servo. Unfortunately for me, this is a long a tedious process as I have not drilled the F-728B and F-729B angles yet. (When I drilled the angles on my first attempt the holes did not appear to line up properly, hence when I reordered pieces for me second attempt, I left them undrilled so I could drill them one I can confirm proper alignment).


First order of business was to cleco the top skins to the aft fuselage, this will ensure that the F-706 pieces are all in proper alignment. I could then check alignment of the bellcrank bolt. Alignment looks very good compared to the first attempt.


Oddly enough the factory holes in the channels/webs were spot on. This lead me to believe that on my first attempt there was something up not factory related that caused my alignment to be out. Perhaps the assembly I had originally made was ok, just it not being cleco'ed into proper positions made the alignment way off. Oh well... i'm good now.

I then managed to drill the bellcrank bolt holes F-728B and F-729B angles using pieces from my first attempt as a guide. I set up the drill press and used a 1/4" bit and drilled the holes, then reassembled in the aft fuselage.

Next I needed to locate the autopilot mounting plate 3.43" measured from the center of the bellcrank bolt to the front face of the mounting plate flange. Not as easy to measure as you would think as the angle of the mounting plate is not perpendicular with the top or bottom of the F-729 channel. I figured the best way was to measure and mark a plywood spacer to help.


Once the mounting plate is positioned, its easy to drill the #30 holes at the top. The holes along the bottom flange take a bit of head scratching. The installation manual states the bottom flange can be removed, but I decided to keep it as it will provide a more solid mounting point. I marked out on the bottom of the flange where the mounting holes for the adjacent channel line up and choose to drill new holes in between, like this. 

I figure it's most advantageous to stagger the rivet holes rather than keep then aligned. Also, figuring out the distance from the edge to drill the #40 holes was a bit of a head scratcher. Since the mouning plate is 0.050" thick I will countersink for the rivets. The MIL-Spec states minimum edge distance for 3.32" countersunk rivets is 0.219". I opted to use 0.240" from the edge of the flange. Once the holes were drilled in the flange, I used the long #40 drill bit to drill to the bottom of the aft fuselage.
 

Thursday, April 18, 2019

Completed drilling the Aft Fuselage and Preped F-779 - 4 hours

I managed to complete the drilling of the aft fuselage. Now it's time to disassemble and prep all the skins for deburring, dimpling, priming, etc.

The part I focused on first was the F-779 aft bottom skin. This is a fairly thick piece (0.040") and I had decided to dimple this for rivets. The issue for course is dimpling thick material can lead to cracks if you're not careful. I spend the entire evening cleaning up holes, deburing and polishing holes with 800 grit sandpaper. From my experience on the fuel tanks...this method works extremely well.

I then dimpled the holes in the F-779 skin and examined each hole with a magnifying glass and a flashlight to ensure each dimple was clean. In the end i'm very happy with how it turned out.


Tuesday, April 16, 2019

Began phase 2 of drilling the Aft Fuselage - 3 hours

Now that I had the aft fuselage assembly reclecoed (added the lowest j-stiffeners and removed the F-779 skin) I needed to re-level and plumb the entire aft assembly....again. A very tedious process but totally required. Once the plumb-bob settled and I was happy with the alignment I began to cleco the F-786C j-stiffeners to the side skins so I could start the process of match drilling those stiffeners. I started at the back and worked forward.


Monday, April 15, 2019

Finished phase 1 of drilling the Aft Fuselage - 3 hours

This evening I finished up match drilling the aft fusalage. Well...almost. I've not inserted the bottom most j-stiffener as getting the F-779 cleco'd into the side skins is impossible with it in place during initial drilling. I then uncloed nearly the entire assembly to install the lower F-768C J-stiffeners and began to re-cleco the assembly.
 
I was getting a bit tired of working on the fuselage  so I jumped over to begin the rough fabrication of the F-792 rudder stops. Of course there is absolutely no need to do this now...it not actually required till much later. I just needed a little break from clecoing.


Saturday, April 13, 2019

Started match drilling the aft fuselage - 5 hours

I was now ready to begin drilling the aft fuselage. I started from the back and worked my way forward. Soon enough, I stumbled across and interesting hurdle. After batch drilling the bottom of the F-711 bulkhead you will notice that the holes are not centered in the tab, in fact they have a tenancy to be fairly close to the bulkhead web. I began to worry a bit about how I was going to work in this area for dimpling. I'll spare you the drama but basically after looking into things, it appears from what little pictures people actually post of this area on their build logs, many seem to have similar situations. I discussed the matter a lot with my buddy Mike and researched heavily into the option of countersinking the 0.040" F-779 skin as that will prevent the need for dimpling the tab which I was concerned with. In the end I decided against it. The manual states that it is common to countersink for rivets in material thicker than 0.040". When I first read it I missed the 'thicker than'. So I was seriously contemplating it. I double checked the head thickness of an AN426AD3 and its not all that less than 0.040". Also considering that I have to countersink the curved aluminum skin....the changes of a knife edged hole become extremely likely. Hence in the end I decided to dimple. 

I unclecoed the F-712 and F-711 bulkheads to have a better look at what I was dealing with. In this picture it looks a little better.

I took out my Cleveland tool 3/32" close quarter die and ground it down a little on one side. I was then able with the help of bending the back tab a bit I was able to dimple the holes with the pneumatic squeezer.


Thursday, April 11, 2019

Levelling the twist in the Aft Fuselage - 4 hours

A couple of evenings in the garage with not a whole lot to show for it. I dug out the plumb-bobs and set up to remove the twist out of the aft fuselage. Setting up the plumb-bob for the back is vary easy, but a bunch of time spent figuring out how best to hang the plumb bob out front. The angle of the bulkhead prevents the plumb-bob hanging from a cleco hole above. In the end I used a long aluminum angle to line up the backbone of the airframe, and then suspended the plumb-bob off of that.


To help ensure everything was straight. I used levels across the top as well.

If that wasn't enough...I made extra sure checking plumb-bob alignment with the laser. (I was a little unsure how aligned the angle at the top of the bulkheads was....this proved it)


Tuesday, April 9, 2019

Completed final fitting of the aft fuselage - 4 hours


A big day in the garage for a weeknight. I just cant seem to get 100% fitment on the F-779 and F-773 side skins as the lower J-stiffners are in the way. I've decided to remove the lower J-stiffeners in effort to get access to fully cleco the F-779 bottom tail skin. I've read as much as I can on other blogs and after much thought, I've decided that this is the only way I can make all of the aft fuse fitment work. The idea is to plumb, and match drill everything. Then reinstall the lower J-stiffeners into the assembly and finally match drill those very last. That's the only way I can see I can get a full proper cleco as it's just impossible to fully cleco the assembly.

Before I disassemble for the millionth time to remove those stiffeners...I needed to address how I transition the stiffener along the side skin to the F-779 tail skin. Doing nothing there is quite a gap to deal with. If I rivet it with doing nothing, there is an area of potential stress to bridge this transition. I've put a question to the forums as nobody seems to address it on the build logs.


Update - With a little research and thought, I will file down the sharp edge on F-779 (similar to the lap joint on the wing skins) so that I do not have a hard 90deg edge digging into the J-channel after I rivet the assembly.

With the lower stiffeners removed....I managed to get everything clecoed up. Again...Not going to sugar coat it...Its a fight right to the end. Everything boils down to a specific method and progressive pattern to cleco in order to get it all done. Each cleco on the tail bulkheads are smothered in boelube before forcing into the holes. Ugh....But in the end I prevailed.


Much thanks to my good friend Mike A.K.A. @inspiringpursuit (Who's building both the F1 rocket and the Stewart S-51 mustang) who stopped by to give advice, encouragement and checked my work when I was uncertain.


Monday, April 8, 2019

Further fitting of the F-712 and F-711 bulkheads - 8 hours

Very long and annoying day in the garage these last few days. I've been spending a few hours an evening messing with the fitment of the F-712 and F-711 bulkheads to the F-779 skin. Lots and Lots of fussing. Its quite a process to get things tweaked to finally be able to get them fully clecoed to the bottom tail skin. I won't sugar coat it, the process is extremely frustrating and I've lost a bit of sleep thinking about if I've done something wrong, or if I might be wrecking things. Once I was able to get the fit decent I then clecoed it to the aft fuselage and soon realized....I need to work the bulkhead tabs some more. ugh.


A good look of how I still need to tweek the fit so the bulkheads align better with the fuselage sides.


Sunday, April 7, 2019

Final fitting of the aft fuselage - 8 hours

Very long and frustrating day. I started the day with a little research on how at the tail pieces fit together to make sure all is good. A little head scratching but the F-710 bulkhead sits above F-779 bottom tail skin, which sits on top of F-778 bottom aft skin and the F-773 side skins.

But now the real challenge is having everything line up when clecoing....but it doesn't.
I don't know where to begin. I've clecoed and unclecoed some many times. Its very difficult and extremely frustrating. I managed to get the assembly pretty good, but the F-710 bulkhead is really really tight and rippled which did not sit well with me. Also I cannot fully cleco the F-779 bottom tail skin as the lower J-stiffener is in the way. Here is as far as I got.

Saturday, April 6, 2019

Began final fitting of the aft fuselage - 6 hours

I needed to disassemble the aft fuse in order to start to devinyl the skins. But before I could reassemble I needed to ensure my sawhorses are level. My garage floor is fairly poor when it comes to how level things are. I built a frame on the floor to place the sawhorses on, and leveled that frame.


I then got to work de vinyling the aft fuse skins. A fairly long process but I assembled as I went.


I then started to look how to fit the F-710 bulkhead into the fuse.