Bit of a long day today working with little progress. Some tedious tasks that I need to take care before I can fit the longerons. Firstly I need to set a handful of rivets still in the aft fuselage. These are not that easy to set due to the curvature of the skin. I managed the very rearward set of rivets but for 8 others I need to call my buddy mike for help.
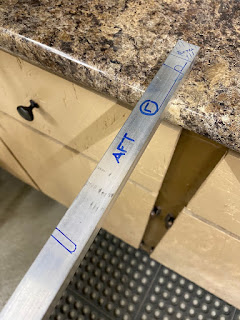
Mike texted me back will come by in a few days so in the mean time I will have to put the fuselage on pause and move onto the longerons. I brought them down from storage and cleco'd them together. One of the tasks that I held off on was to cut the groove into them. I wanted to wait till now to do that rather than do it prior to bending them.
Now that they are celco'd together, I could verify that they are nearly symmetrical. (well one was out about just a tad ~ 1/32 or 1/16"). So I set it all up, and remeasured and sorted the correct length. Now that they are perfect. I marked out the areas I need to cut.
Rough cuts made on the bandsaw, but then all the rest of it was finalized with lots of careful filing.
I left the aft end of the longeron long on purpose. I will mark them for proper edge distance and cut later. I also left them purposely thicker than 0.125". I'll take the thickness down later.
Saturday, November 30, 2019
Sunday, November 24, 2019
Finishing the F-715 ribs - 4 hours
Now that the ribs have a few days to cure with the primer on them, I'm ready to rivet the nutplates on.
The F-776 bottom skin needs to be deburred from the match drilling and dimpled. Dimpling after the surface is primed usually results in the primer cracking. So I need to wipe these dimples clean with acetone and give a coat of primer to clean them up.
I struggled a bit with trying to figure out when to rivet the ribs to the bottom skin. The plans don't say and according to the different build logs I reference...So do it now, some do it later. I'm a tad concerned at the accessibility of driving the -4 rivets in the side skins at this location in the future, so I'll hold off riveting them for now.
Monday, November 18, 2019
Finishing the prep on the F-715 ribs - 2.5 hours
Sunday, November 17, 2019
More nutplate work and finished the flap blocks - 5 hours
A good day in the garage today. I worked on all of the little outstanding items that I needed to get done. A small to do item was to drill the one-legged nutplates for the two mounting holes in each end of the F-705 bulkhead. As I did previously I carefully lined up a sacrificial nutplate and clamped it with a cleco to drill it.
Next, I drilled all of the nutplates in the F-715 ribs. (I'm getting tired of nutplates).
Next task that needs to be done is to drill the tooling hole out on the F-715 rib to 5/8" for the electrical wiring/pitot tubing (As called for on drawing 28/Side skins). I decided to drill the hole to 1/2" for now....I can open the hole up to 5/8" at a later time. I'm not 100% that this will be the pitot tube routing so hence why I'm reluctant to open to the full 5/8". I error on the side of caution in this case.
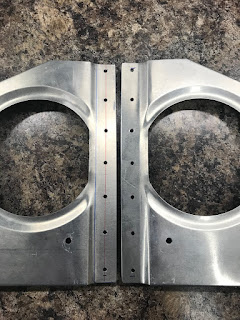
Next task that I want to get sorted out was that I was never happy with how I drilled the F-661EF flap bearing blocks. They way I was doing it was that the holes that met the F-705 bulkhead were spot on, however the holes on the opposite side of the flap bearing block where a bit skewed off to the side. Not parallel and perpendicular. Much has to do with the fact that the block material distorts when you are clamping it to the drill press, and the other is that you are drilling quite distance all accentuate the possibility of error. After a number of previous attempts at drilling these...There's quite a trick to learn. 1st step is to mark out the proper hole location on the block....But on both the forward side and the aft side. Then set up and drill with #40 halfway through the block....Flip the block over and drill halfway through the block on the other side. If you have done the measuring correctly....both holes with line up correctly. Keep repeating this process with #30, ~#20, then finish with #10. By the time you get to this point you will be able to run the #10 drill bit through the entire way and the hole will be perfectly parallel and perpendicular. I then could mount the assembly and start marking out the top most holes.
Repeat the lengthy and painful process for the top most holes. The result is a perfect fit and the bolts will be perfectly parallel and perpendicular. (Not slightly angled)
Saturday, November 9, 2019
Drilled seat pans to the F-715 ribs - 3 hours
The plans have you allow a distance of 0.032" to allow a tiny gap between the seat pan and the side of the fuselage skin when it get installed. So to do this I used a scrap piece of 0.032 and epoxy'd it to a small piece of oak to use as a guide.
The oak sits on the rib, and the aluminum scrap sets the proper 0.032" distance. Ready to drill. The spacer gets placed at each hole that gets drilled out.
The holes are not perfectly set on the centre line, but I suspect its because of the 0.032" offset.
Next step was to match drill the holes on the sides of the F-704bulkhead/spar into the F-715 seat rib. This is a bit more nerve wracking then I would have liked it to be. Takes a little head scratching to set the ribs vertical position especially since I drilled the once side before I drilled the other. I had to make sure both were set the same distance (vertically)
In the end I think I did just fine.
Monday, November 4, 2019
Mounting the seat pans - 2.5 hours
Spent a little time working on getting the seat pans installed. The plans have you cleco them in so the F-715 ribs can be properly drilled. Since I have nutplates, it made sense to use screws where I could.
Now I need to figure out how to set the proper distance between the seat ribs and the seat pan.
Sunday, November 3, 2019
More F-715 Rib work - 4 hours
Saturday, November 2, 2019
Working away on the F-715 Seat Ribs - 7 hours
I'm glad to be able to put a decent day into the build. As usual work is very busy and the lack of work shows. But fortunately I put in a long day. Since the center lines are all marked out on the ribs. I need to figure out where to flute the ribs. I started by clecoing the ribs to the F-705 bulkhead.
Next, I managed to mark the rivet holes on the under side of the ribs on both sides. Since I know where the rivet hole are to be drilled. I can start to flute the ribs. Lining the edge of the rib with the arc of the rivet holes in the bottom skin works perfectly to adjust the curve.
Now that the rib contour is roughly figured out. The top needs to be fluted. In order to determine the fluting location the mounting holes need to be marked. I dug out the seat pans and cleco'd them to the assembly.
At this point the mounting holes and defined and I can flute accordingly.
Since the mounting holes are far apart on the top of the rib. I used a nut plate to determine where to flute and not affect the mounting the nutplates.
This ended up to be quite a long tedious process. But its worth it in the end. Most important is to take your time and check the curve by continually clecoing/unclecoing the seat pans to get the right curve. Not that the curve is set, the rib doesn't want to sit in place easily as the rib is slightly too long and rubs on the main spar/F-704 bulkhead.
Reading other build logs it was apparent to pay attention to the area as some have trimmed too much and had edge distance problems. So I marked out the rivet holes drew a center line and then drew a line of where I needed to trim. The trim line still gave lots of edge distance so all good there.
Now that the ribs will fit nicely in place. I started to match drill the rivet holes...Starting from the rear and working forward. Again, a very tedious process, but the center line was very easy to see through the rivet line. I drilled the first hole and confirmed edge distance was ok as the rear most hole is quite close to the end of the rib.
I continued on, Drilling and checking.
By the end of the evening I was just about finished the right rib when I decided to call it a night.
Next, I managed to mark the rivet holes on the under side of the ribs on both sides. Since I know where the rivet hole are to be drilled. I can start to flute the ribs. Lining the edge of the rib with the arc of the rivet holes in the bottom skin works perfectly to adjust the curve.
Now that the rib contour is roughly figured out. The top needs to be fluted. In order to determine the fluting location the mounting holes need to be marked. I dug out the seat pans and cleco'd them to the assembly.
At this point the mounting holes and defined and I can flute accordingly.
Since the mounting holes are far apart on the top of the rib. I used a nut plate to determine where to flute and not affect the mounting the nutplates.
This ended up to be quite a long tedious process. But its worth it in the end. Most important is to take your time and check the curve by continually clecoing/unclecoing the seat pans to get the right curve. Not that the curve is set, the rib doesn't want to sit in place easily as the rib is slightly too long and rubs on the main spar/F-704 bulkhead.
Reading other build logs it was apparent to pay attention to the area as some have trimmed too much and had edge distance problems. So I marked out the rivet holes drew a center line and then drew a line of where I needed to trim. The trim line still gave lots of edge distance so all good there.
Now that the ribs will fit nicely in place. I started to match drill the rivet holes...Starting from the rear and working forward. Again, a very tedious process, but the center line was very easy to see through the rivet line. I drilled the first hole and confirmed edge distance was ok as the rear most hole is quite close to the end of the rib.
I continued on, Drilling and checking.
By the end of the evening I was just about finished the right rib when I decided to call it a night.
Subscribe to:
Posts (Atom)