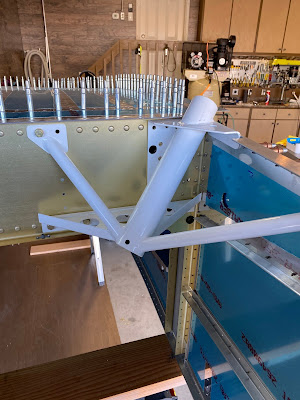
Kept on countersinking....Aluminum shavings everywhere.
Saturday, October 10, 2020
Friday, October 9, 2020
Completed fuselage disassembly and started countersinking - 4 hours
I completed disassembly of the fuselage and managed to get all of the pieces laid out in the garage. I began looking over parts and it's staggering to see all of the list of items on the to do list that need to happen before I can start assembly.
The item I was most keen on getting dome was all of the countersinking. And there is a lot. First I opened up the #30 holes on the longeron. I was very careful not too countersink too deep. This is always a huge concern for me as the data for a proper countersink is extremely cryptic.
Once I was happy with the #30's I then moved on to the #40 holes....Wow there is a lot of them.
Thursday, October 8, 2020
Baggage Compartment work - 3 hours
I need to do a bit of work in the baggage compartment. Since I am in Canada, I have to make all of my panels removable to aid in inspection. Technically the two aft baggage compartment side panels still allow a view of all rivets with an inspection mirror. But I decided to make it all removable. All of the floor (with the exception of F-705) with me flush screws. Everything else will be regular screws.
Wednesday, October 7, 2020
Opened the two holes in F-796B to 3/16" - 1 hour
One if the items on the to do list that I was avoiding was to open the two #30 holes in the F-796B angle to a #12 hole to allow the AN3 bolt on top and a #10 screw on the bottom. Being that not everything is permanently together, I opted to open the holes to 3/16" to get a tight tolerance. I can always open then to #12 later if needed.
I used my 3/16" reamer and by ATS drill guide. Turned out excellent.
Tuesday, October 6, 2020
Marking the brake line holes in the bottom skin - 2 hours
One of the items I noticed was quite right was the alignment of the holes in the gear weldment and the pilot hole in the bottom skin for the brake lines. They don't exactly line up as well as some of the other pre-drilled parts. I decided that I will open the holes so that they align. First job is that I need to mark the holes.
I clecoed the bottom skin on and fitted the gear weldments.
One of the items you have to pay attention to is that the most forward hole in the bottom skin (that is a the center) gets drilled out to #12 for future U-720A on the tri-gear RV's. Since I am building the 7A...I need to do this. I'm reluctant at going the full #12 now, so I just opened the hole to #30 so I don't accidentally dimple/rivet it.Now that its all together you can see how the pilot holes line up. One is decent, and the other is a bit off.
I scratched my head on how I was going to mark the correct location on the bottom skin. I finally came up with the idea of using a paper tube to diameter of the hole in the weldment. I dipped that paper tube in white paint which I was able to stick through the weldment hole and mark the bottom skin. It worked very well.
I will open the pilot holes up just a bit (not to the full 5/8" opening). Then once the fuselage is fitted together and the parts are in their final position, I will use the dremel and files to open up the holes in the skin perfectly centered.
Sunday, October 4, 2020
Initial fitting of the Gear Weldments - 4 hours
I managed a more productive day. I need to fit the WD-721 landing gear weldments to start drilling the pilot holes on the side skins. The fit seems to be really good. I reamed the mounting holes with the appropriate reamer. Some of the powder coating in the holes prevented the bolts from going through.
It took some time to get the bolts installed as there is a bit of a trick and process to it.
Straight away I noticed that they is some interference with the bottom/forward cleco in F-704 as it interferes with the aft portion of the gear weldment.
I marked the hole and I see that I am going to have to use a file and cut a relief for the future rivet shop head.
Once I was satisfied with a nice tight fit. I began drilling the pilot holes in the weldment/side skin. For now, I only drilled the main portion of the weldment to #40, and the forward support tube/flange is drilled to #30. I have decided I will open these holes up to the appropriate 3/16" holes later in the build where the instructions have you install the gear weldments. (With bulkhead F-902 installed it becomes extremely difficult to drill the holes in that forward flange, so I want to locate them now)
Satisfied with how things went. I completed the other side.
Wednesday, September 30, 2020
Little bits of launtry list - 2 hours
Still suffering from low build desire. I removed the forward bottom skin on the RV to get at the F-7101 gear attach webs to open the pilot holes to 1" for the fuel lines. I also began to mark up the floor stiffeners to indicate what gets countersunk and what does not. I don't want to wreck any parts...i'm not in the mood.


