Tuesday, October 6, 2020

Marking the brake line holes in the bottom skin - 2 hours

 One of the items I noticed was quite right was the alignment of the holes in the gear weldment and the pilot hole in the bottom skin for the brake lines. They don't exactly line up as well as some of the other pre-drilled parts. I decided that I will open the holes so that they align. First job is that I need to mark the holes.

 I clecoed the bottom skin on and fitted the gear weldments.

One of the items you have to pay attention to is that the most forward hole in the bottom skin (that is a the center) gets drilled out to #12 for future U-720A on the tri-gear RV's. Since I am building the 7A...I need to do this. I'm reluctant at going the full #12 now, so I just opened the hole to #30 so I don't accidentally dimple/rivet it. 
 

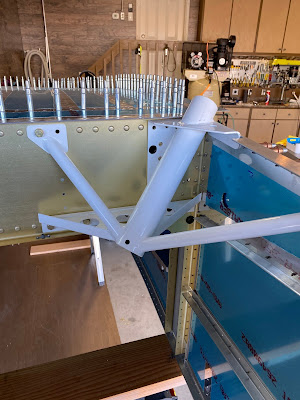
Now that its all together you can see how the pilot holes line up. One is decent, and the other is a bit off. 


I scratched my head on how I was going to mark the correct location on the bottom skin. I finally came up with the idea of using a paper tube to diameter of the hole in the weldment. I dipped that paper tube in white paint which I was able to stick through the weldment hole and mark the bottom skin. It worked very well.


I will open the pilot holes up just a bit (not to the full 5/8" opening). Then once the fuselage is fitted together and the parts are in their final position, I will use the dremel and files to open up the holes in the skin perfectly centered.


Sunday, October 4, 2020

Initial fitting of the Gear Weldments - 4 hours

 I managed a more productive day. I need to fit the WD-721 landing gear weldments to start drilling the pilot holes on the side skins. The fit seems to be really good. I reamed the mounting holes with the appropriate reamer. Some of the powder coating in the holes prevented the bolts from going through.

It took some time to get the bolts installed as there is a bit of a trick and process to it.


 Straight away I noticed that they is some interference with the bottom/forward cleco in F-704 as it interferes with the aft portion of the gear weldment.  


I marked the hole and I see that I am going to have to use a file and cut a relief for the future rivet shop head.


Once I was satisfied with a nice tight fit. I began drilling the pilot holes in the weldment/side skin. For now, I only drilled the main portion of the weldment to #40, and the forward support tube/flange is drilled to #30. I have decided I will open these holes up to the appropriate 3/16" holes later in the build where the instructions have you install the gear weldments. (With bulkhead F-902 installed it becomes extremely difficult to drill the holes in that forward flange, so I want to locate them now)


Satisfied with how things went. I completed the other side. 


Wednesday, September 30, 2020

Little bits of launtry list - 2 hours

 Still suffering from low build desire. I removed the forward bottom skin on the RV to get at the F-7101 gear attach webs to open the pilot holes to 1" for the fuel lines. I also began to mark up the floor stiffeners to indicate what gets countersunk and what does not. I don't want to wreck any parts...i'm not in the mood.


Sunday, September 27, 2020

Finished assembling the rudder pedals - 1.5 hours

 I'm really struggling with motivation on the build right now. Can't seem to jump into it with both feet. 

In the spirit of doing something, anything. I decided to rivet the rudder pedals. This one was a difficult decision as I didn't know if I should paint them, anodize them, powder coat them, or leave them. At the local fly-in I recently went to I noticed many folks don't do anything with them. I finally decided to leave them bare reasoning that what ever finish I choose will end up wearing off. I will install skateboard grip tape on them to help with traction. 

If I don't like it....how hard is it to make new ones? Not hard at all.


Saturday, September 26, 2020

Even more armrest work - 2 hours

Now that I have the armrest angles all marked out, I began the tedious process of drilling and opening up the lightening holes. I started at #40 holes, then systematically opened them to 1/4". The weight now drops to 163 grams so too bad from the original being over 200 grams.  


Tuesday, September 22, 2020

More arm rest work - 2 hours

I managed a little bit of time tonight on the build. I started off by countersinking the angles to allow for the dimples in the armrest. Also, I need to start thinking about holes for reducing weight. I dug out the fan spacer and decided I would mark centre between each rivet hole to allow for removing material.


Sunday, September 20, 2020

A laundry list of items

 I've basically finished the items noted in the instructions up to the point where it says "Riveting the forward side skins". The instructions note that " There is a laundry list of small task that must be completed. You may have done some already. If not, complete them now" The instructions are rather vague on what these might be. But I've already started a to-do list some time ago on all the things I need to still finish off.

Here is my laundry list of items (in no particular order):

 With everything still cleco'd together
  • Finish match drilling the fuse (center section/aft section. seat ribs, etc, etc)
  • Open up the #30 holes to 3/16" for the front wing attach bracket.
  • Drill landing gear weldments to the side fuselage.
  • Open fuel vent hole in side skin/gear web to 1".
  • Open brake line holes in bottom skin to 5/8" (Align with gear weldment). 
  • Open fuel vent holes in bottom skin to 7/16"
With everything taken apart
  • Drill the 5/8" rudder cable holes in the F-902 and F-724 bulkheads. 
  • Drill the static line holes in the F-724 bulkhead.
  • Finish strengthening and drilling the armrests.
  • Finish rough-in of the side steps (I'm contemplating on when to do this...now, or when I flip the fuselage....I hate working upside down).
  • Finish installing the 6 rivets in the firewall.
  • Complete the edge roll to the bottom skins/side skins.
  • Finish drilling the holes attaching the tabs of F-724 and F902 bulkheads to the longerons.
  • Prep the baggage are panels, etc for nutplates (All panels are removeable).
  • Debur, edge prep, countersink etc. 
  • Prime
  • Install the nutplates as called for in the plans and also for the baggage area removable panels.

 Well....time to dive into it.

The first item of business I dove into was to finish match drilling everything. I started at the center of the seat ribs and worked outwards.


There is just a ton of cleco's 


Next, I decided to tackle strengthening the arm rests. Yes, it wasn't on my primary to do list, but I think it will be a fun one to do. Material selection was a tough choice. Lots of opinions out there. I want good strength but not with too much a weight penalty. I opted to use 3/4"x3/4"x1/8" thick angle. About the heaviest material out there! Ha Ha. But I do intend to try to cut it down and drill lightening holes to help with the weight. So the angle to start with weights just over 200 grams each side. 

Now I clamped the angle to the work table and used a router with a small radius round over bit to put a radius on the vertex of the angle. Does the aluminum dull the router bit....Yeah probably. Does it do an awesome job, heck yeah!.

With the edge finished, the part nests nicely into armrest. Weight is now reduced to 195 grams. Next, I want to trim the flange of the angle that sits proud of the armrest.This takes a bit of time and work to get trimmed and smooth, but the result is fantastic.

Weight now drops to 173 grams

I used the fan spacer and drilled the angles to the arm rests.