Tuesday, July 30, 2019

Countersinking and dimpling seat and floor ribs - 3 hours

I need to drill the crotch strap brackets for nut plates.  Using the same process from yesterday, these go fairly quickly. I then set up the countersink tool and countersunk the rivet holes for NAS/Opps rivets.

I then countersunk all the other rivet holes in the ribs for the nutplates. Once that was done, I could then dimple the #8 screws in the baggage ribs. (Note that the most forward #19 hole in the rib is not dimpled as that is the hole that meets the F-705A bulkhead and I decided not to dimple those holes).

Side note. I had to grind down the edge of my #8 screw female die so that it would fit in the flange. I better order a new one 


Sunday, July 28, 2019

More prep’ing for the removable floor panels - 9 hours

Nice big day in the garage. I've been thinking on how to secure the floors at the F-705 bulkhead. I see some have chosen to use flush #8 screws but I'm concerned with how narrow the F-705A flange is to accept the #8 screw. Its much more narrow than the seat and baggage ribs. I've decided to not dimple these and just use #8 round head screws. First step is to drill out the holes to a #19 hole. I cut a piece of MDF and filleted the edge with a router so it will nest nicely inside the F-705A bulkhead.

I began clamping and securing the MDF. I used clamps which will allow me to drill the web to use clecos.

I then installed clecos and removed the clamps.

With the clamps removed, I can setup up the bulkhead vertically so I can open the holes on the flange to #19.

One of the tricky holes is the very last hole at each end. Its too close for the 90deg drill, and I do not have a super long #19 drill bit. So I used a super long #30 drill bit and then used by round chainsaw file. Coincidentally my round chainsaw file makes holes about #21/#20 so I am super lucky.  


I started to prep all of the F-716 seat ribs for nut plates. I drew a centre reference line down the flange of all ribs. I then use a sacrificial nut plate with a #8 screw and alight the nutplate to the centre line.


Clamp one leg, ensure straight, drill opposite leg then cleco it. Remove the clamp and drill the remaining hole. Over, and Over again. By the end of the day all of the ribs have been drilled for removable floors.
Saturday, July 27, 2019

Prep’ing for the removable floor panels - 4 hours

I de-vinyled the seat plans/floor and baggage floors. A bit tedious and its not really necessary I suppose but heck...why not.

Once I fitted the seat pans/floors to the ribs, I soon realized match drilling the holes to #19 wasn’t going to be easy or all that accurate due to how tricky the fit was turning out to be in some areas. I ended up deciding that I would open up the holes in the floors and ribs separately.  I figure these are not a super critical area and if you are using #8 screws, getting it absolutely precise is not really necessary.

I picked up some MDF at Home Depot to help as a drilling guide. MDF works great in help ensuring drill bits do not wander. I opened up the holes in the seat pans/baggage floors to #19.


Next I cut the MDF into strips. This would allow me to fit all of the ribs onto the strips to open up the holes in the flanges.


 I wasn’t ready to call it a night just yet so I set up the drill press to drill the Flap mounting blocks.

Just tricky getting the holes drilled perfectly perpendicular and parallel. I messed up one block a little, and the second I managed to get near perfect. I suppose I might order another....It’s bugging me its not 100% and its a cheap part.

Friday, July 26, 2019

Misc centre section work - 5 hours

Finally a decent day on the build. I managed to get my neighbour to give me a hand to flip the center section.


Now I need to countersink the holes along the front of the F-776/F-704 spar as per the Drawings and Vans Construction FAQ. Of course I really took my time with this. A person really doesn’t want to screw this up so I really wanted to be sure which holes needed countersunk.

As I am building a RV-7A I need to countersink the first five holes on each side, then after that only the 11, 19, 27, 35 review holes get countersunk. My plan is to go with Vans Option #1 and to dimple all the other holes.


One of my big questions is what to countersink the rivets to. According to the AutoCAD drawings that I’ve done on countersink depth. A countersink diameter of 0.208” is ideal for accepting a dimple in 0.040” thick material. However I’m extremely reluctant to go that depth...also I have to counter sink the topside of the main spar on the outermost 5 rivets. Makes me a bit nervous. I settled on slightly under countersinking with a diameter of 0.194”. I don’t think it will be too big a deal is not...Better safe than sorry right???


Once I was done that, I got some help flipping the centre section back around and began disassembling.

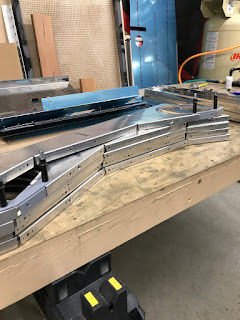
I had a good look at all the front webs of the F-716 seat ribs to determine the edge distances on the AN3 bolt holes. Most of the holes look good however a few are boarder-line with good edge distance so I plan on building doublers for most of the flanges as per Van's tech support suggestion (See the July 7-19 blog). This will make for a solid and uniform installation. Here's a good look at all the ribs.


Thursday, July 25, 2019

Drilled the F-704H panels - 1 hour

Again...Just a small day on the build. My garage has been taken over by the timberhawk so I have little space to work with, so I’m not very motivated to build lately. I started by getting the seat pans/floors removed. A bit of cleanup and then I managed to get the F-704H panels drilled.

Sunday, July 21, 2019

Fitting seat pans/floors - 2 hours


Again, not much work being done on the project lately. I’ve been concentrating some time and effort getting the Timberhawk Kids plane that I’ve been working on ready for the air show.

I managed to get a few hours of work in on the RV as I fitted the seat pans/floors to the centre section assembly. I need to get to match drilling the floors to the centre section ribs.
After everything was fit up, I managed to drill the mounting holes for the seat belt crotch strap to #40. 

I wasn’t very happy with the alignment...The top most holes weren't aligned as well as I would like. The top of the crotch strap brackets have a little give to them. A little head scratching and I decided to move the hole so that it would be better aligned to the adjacent hole. I was only about 1/16” or so out, enough that it bugged me, but it was easily moved As I used a very small round file and began enlarging the hole in the direction I wanted. Took a little time but eventually it was centred and I could ream it to #19.

That’s enough for the day.

Friday, July 12, 2019

Mounted the aileron trim arm - 2 hours

Not much work on the project today. I booked the plane this afternoon to do some flying, but it wasn’t quite ready to fly from its annual that was completed yesterday. We ended up installing the front cowl and I learned how to do an engine run-up. I wrote up a report and turned it in. No flying today....but still a good plane day!

When I got home. I dove into mounting the aileron trim onto the plastic mounting block. First item that the plans have you do is to angle the arm 10 degrees down.


Next, I fit the assembly and marked the cotter pin hole and drilled to 1/16”.


Once that was done... The shaft of the trim arm could be trimmed down. That steel is really tough....took me a while to cut on the band saw. Once the rough cut was done....I trimmed it down on the sanding station. I then installed the large washer and cotter pin. As I want to prime before assemble...one of the items I need to do before priming is countersink the #10 mounting screw. Not a quick process....But it’s done. I’m now ready to prime.