Showing posts with label Wiring. Show all posts

Saturday, November 25, 2017

Picked up some AeroLED's


Managed to pick up some AeroLED’s Navigation/Anti-collision Strobe/Position lights. Pulsar NS and the Suntail. I hooked them up to a 12V battery to test them out and they work perfect. Wow are they bright.
  

Wednesday, October 26, 2016

Proseal wing conduit and match drilling the Ailerons - 4 hours

Managed to put in a decent evening on the project. I needed to proseal the conduit in the wing ribs. This will help ensure that the ribs don't cut into the plastic conduit as suggested by the manual. The only thing I didn't really think about was how to do it so I had a nice job of it. I ended up using a popsicle stick to put a dab of proseal around the conduit where it meets the rib (both side of the rib) and then I used my finger to spread it around and push it in the voids. Not the most attractive but effective.
 
Once that was done, I turned my attention to the ailerons as I didn't want to disturb the proseal.
I began to match drill the aileron structure. Straight forward. The fun began with drilling the galvanized counterweight pipe. Its at an angle and being steel. It take some time to drill. I drilled the holes to #40. Now the compressor is warmed up, I better give up for the night so as to not introduce condensation into the line.

Friday, October 14, 2016

Pulling conduit in the wing - 2 hours

I had a busy day with other things and I had an itch to complete a task on the plane. I started out with the intention to complete the right wing bellcrank, but there is something not right with the weldment I have. There is a bit of binding when I slide the bushing in. Tries it a few different ways. Nope. So, I will have to purchase another right bellcrank and hope that it will be better.

Not wanting to stop progress I jumped over to pulling the conduit through the wing. It took no time to realize this wasn't going to be easy. I read a few blogs on it and checked with Van's Airforce and the advice is there....Just jump in and pull it through. Makes an awful noise. I noticed that you basically crush the conduit in your hands by pulling it through. At first I was concerned I was wrecking the conduit, but soon realized that the conduit can be massaged back into shape.

After all was said and done....I really didn't care to do this again. Didn't take long, but just felt like i was using a hammer to work on a fine watch. Unnerving.

Wednesday, December 30, 2015

Completed drilling Ribs for wiring, started priming - 6 hours


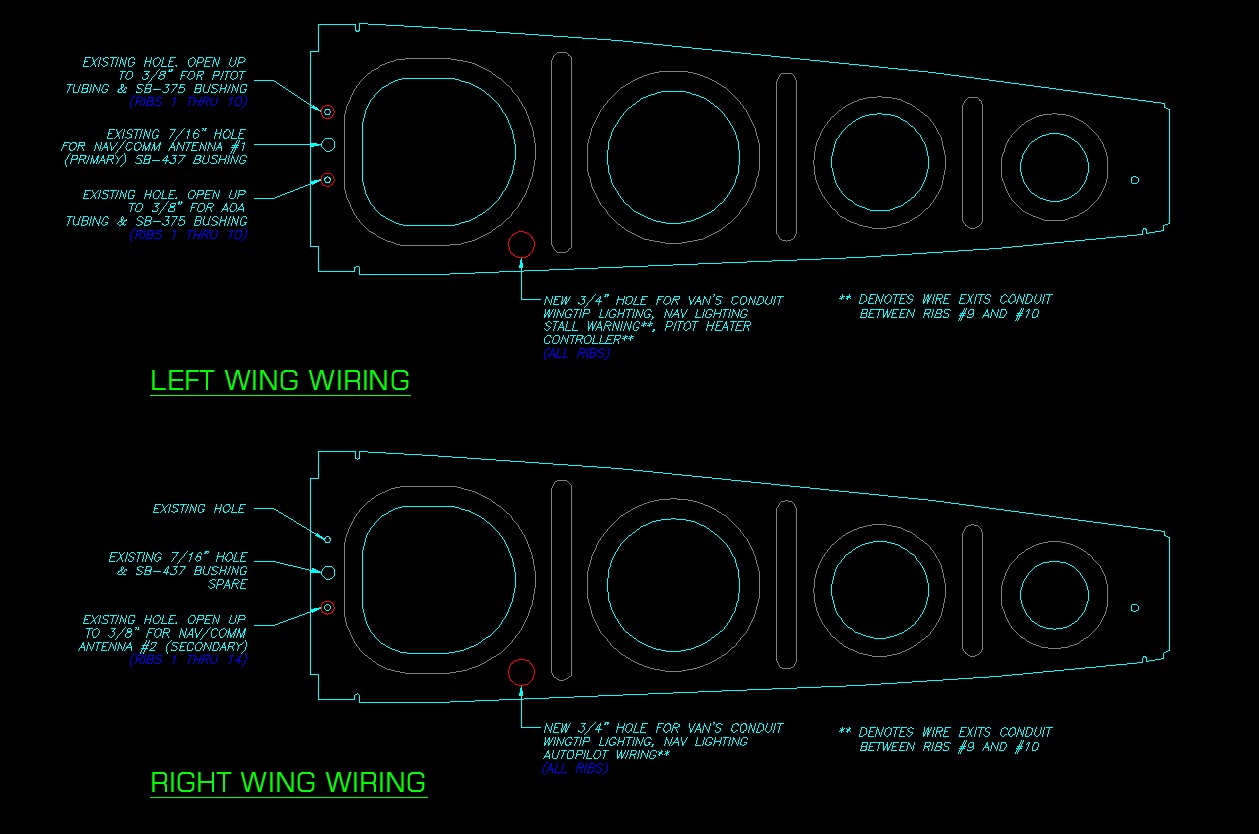
I went back to the drawing board with the wing wiring. A bunch of time was spent last night researching on the internet to ensure my wing wiring would be ok. This morning, I headed out into the garage to open up the tool holes in the right wing ribs (1 thru 10) this will likely be spare or contain alternate auto pilot or OAT wiring.

Here is the completed layout.


I then set up and began the priming process. I set up the tubs and washed each rib in soapy water, scuffed with scotch brite. Rinsed. Dried. Wipe with degreaser. Wipe with MEK. Prime. Labor intensive but I am pleased with the results. Managed to get nearly the right wing ribs done.

Sunday, December 27, 2015

Figuring out Wing wiring

Now to figure out the holes to make in all the wing ribs. I have been researching this for a while and I have a pretty good idea of what I need to do, but I think I'm going to post on Van's Airforce just to make sure that what I plan will work just fine.

Here's what I plan to have:

Left Wing - AerosunVX Landing Lights and Pulsar Nav Lights, Dynon Heated AOA Pitot, Wingtip NAV antenna, Vans Stall warning.

Right Wing - AerosunVX Landing Lights and Pulsar Nav Lights, Dynon Autopilot Servo.


Revision #2 updates:

Moved pitot heat, autopilot, stall warning to 3/4" Conduits. Opens up the original 7/16" holes for potential NAV/Comm antenna's (or other wiring i.e. Remote Magnetometer)