Showing posts with label Fuselage. Show all posts

Saturday, January 8, 2022

Drilled the passenger control stick and fitted fuel pump - 4 hours

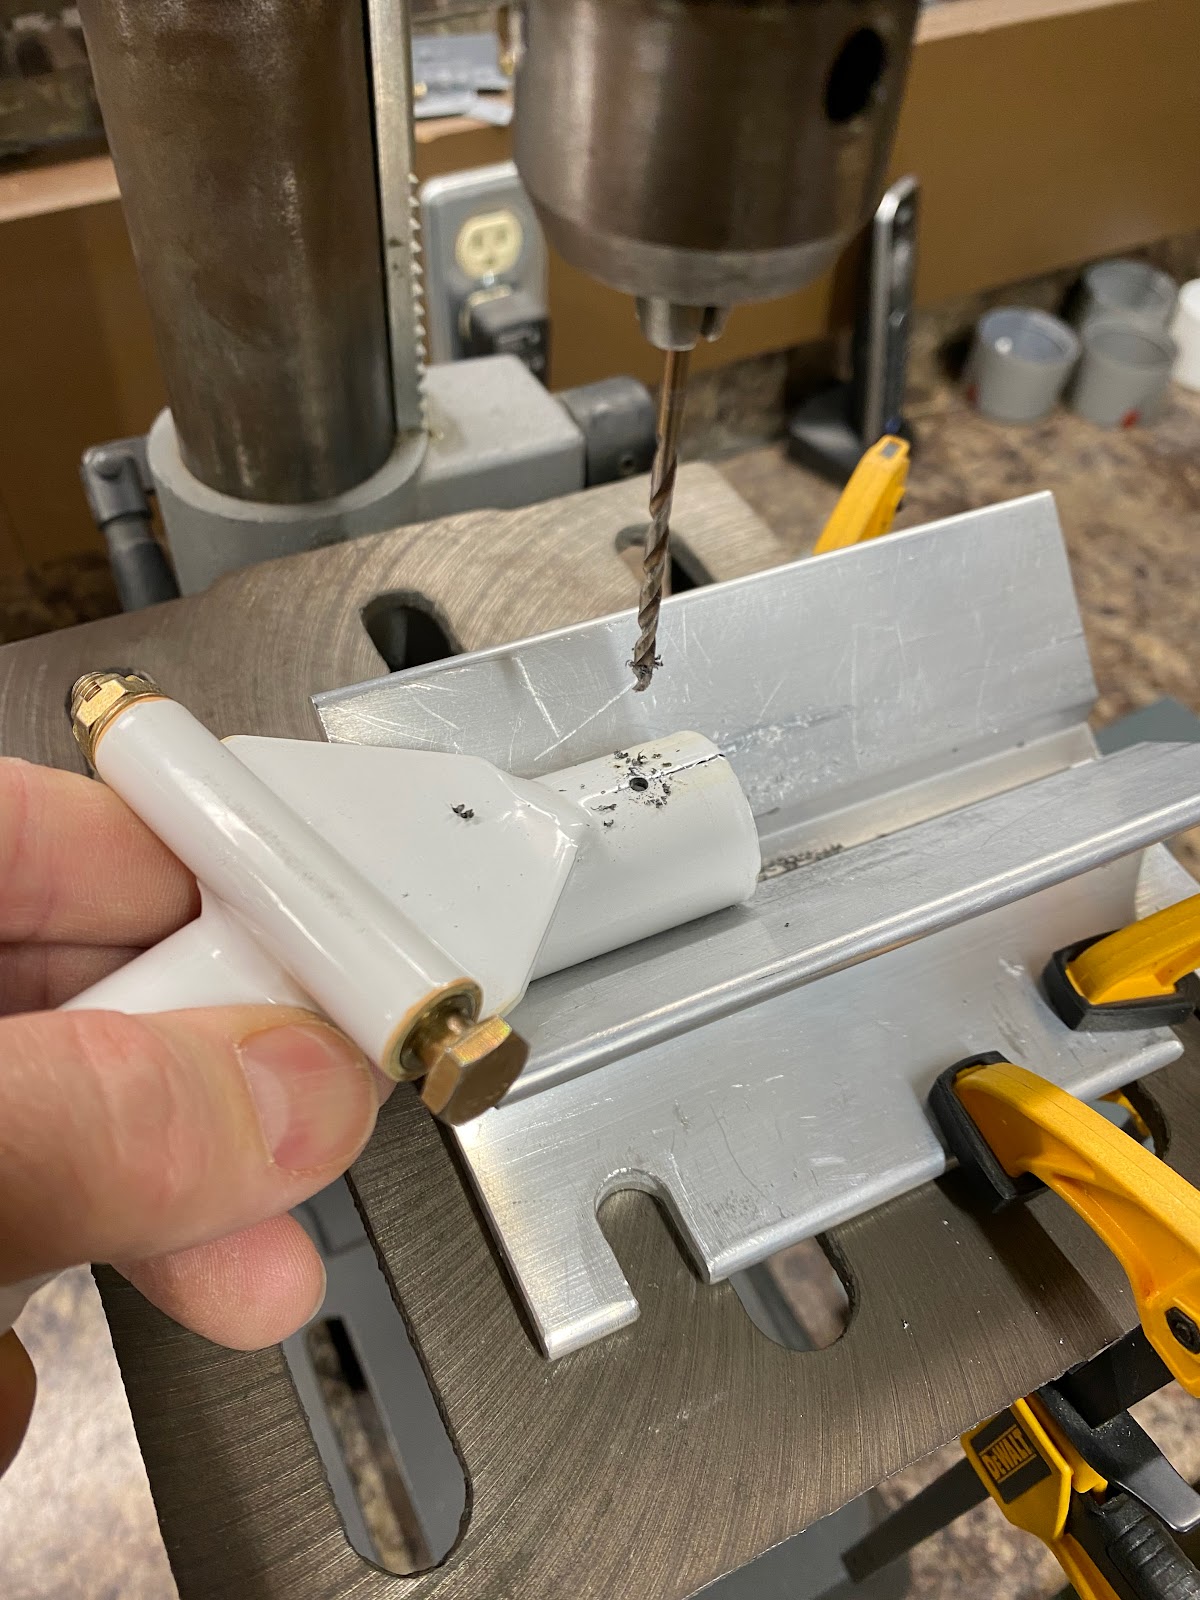
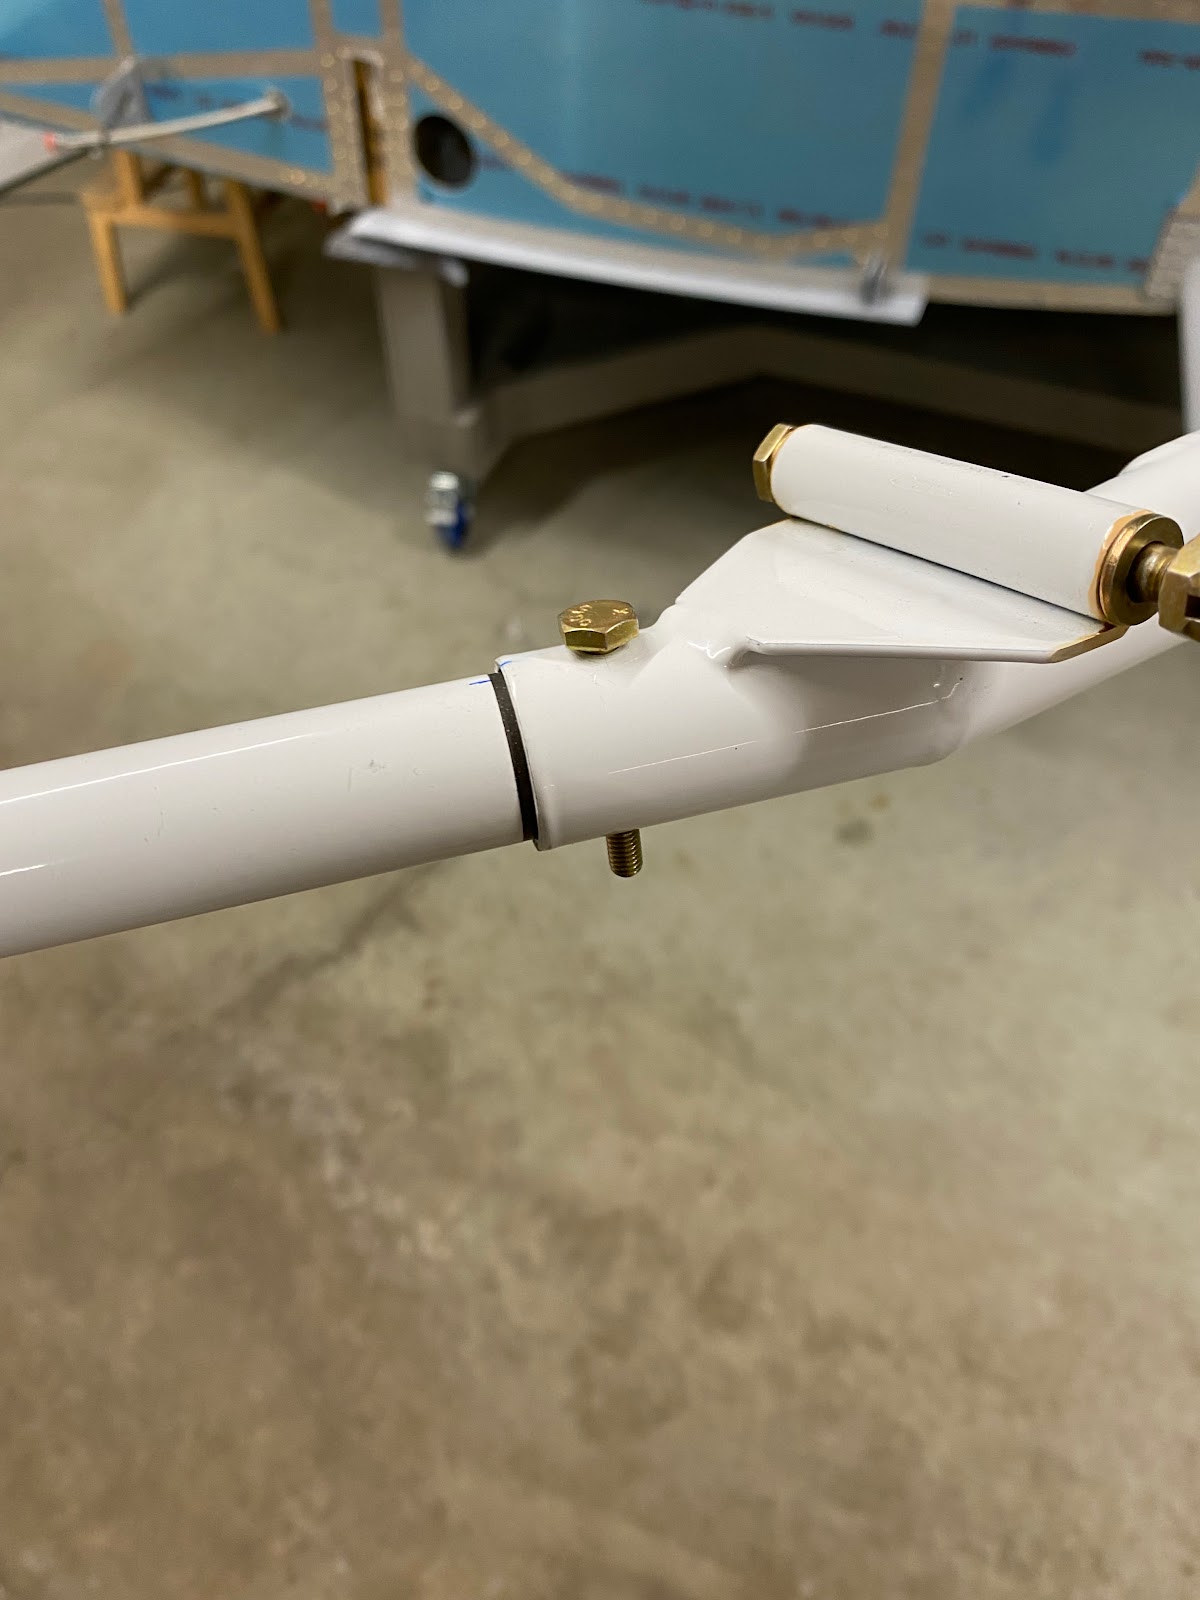
 Lots of little tasks to work on today in the cabin area. One item on the list is to complete Vans Service Bulletin SB-07-2-6 that permanently attaches the passenger side control stick by means of an AN3 bolt. It’s always a tricky task to drill a round tube cleanly and accurately. I drew out the measurements on AutoCAD and created a template. Using the template, carefully transferred the drill points onto the control stick. Closed my eyes and drilled each side to #40. Then I drilled again all the way through with #40. 


Now that I have perfect alignment. I clamped the assembly in the drill press and then upsized to #30, #19, and eventually a 3/16” reamer. 


 The passenger control stick is now ready to be installed in the Fuselage


Next…I might as well see how the fuel pump fits. The center tunnel cover is a bit tough to slide into place with the final paint taking away some clearance. Eventually I got everything into place and it sure looks good. 


Thursday, December 30, 2021

Adding more rivets to the park brake doubler - 3 hours

 Looking at yesterdays work...I think I need to add more rivets. The spacing is just too far apart. 


Adding extra rivets is not a big deal with the use of the fan spacer. 

Its looking much better now. Now I need to clean up all the corners and debur the holes, most important is to ensure a good fit of the bulkhead grommets. 
The fit is excellent so I need to dimple everything before priming. The stainless steel firewall is easy to dimple with the pop rivet dimpler. Just takes a lot of finishing nails as there are so many rivet holes now.


Wednesday, December 29, 2021

Revising the park brake location - 4.5 hours

 I struggled a bit lately on where to mount the park brake as the rudder pedal interferes with the location if I mount it in the Vans standard location. So after a bit of research, looks as if some have mounted it higher but this places it where the IO-360 mixture and prop governor control cables penetrate. So I finally decided to place the park brake in an elevated location near the bulkhead penetrations. Before I do anything, I drafted a template on AutoCAD to get the fit right before I did anything.

The initial position was too low and the result is that the brake lines interfere with the horizontal tubes of the rudder pedals.

I will need to elevate the park brake a bit. So I tested a couple of variations.

Once I was satisfied with the placement. I used the CAD drawing to cut out a doubler as the fire wall needs a bit of stiffening at that location. First step is to get the rivet holes set and the openings in the doubler sorted for the bulkhead grommets that I have. To start I used a #40 bit for all of the holes at the center points.


Using the holes in the doubler as a guide...I set the doubler on the firewall and squared it using a carpenter's square. Then I drilled and clecoed all of the holes.


Now its time to open the holes in the firewall for the bulkhead grommets.

It took some time to slowly and carefully open up the holes to final size in both the firewall and the doubler. By the time I was finished, I was really happy with the results. 


Tuesday, December 28, 2021

Installed the AN837-4D 45deg elbow at the gear weldments - 1.5 hours

 One task that needs to get done is to install the AN837-4D 45deg elbow at the gear weldments. One of the parts of this task that I have not completed yet was drilling the hole in the F-772 forward bottom skin. The plans have you open up the pilot hole to 5/8" diameter however I purposely did not open it up all the way. The reason why is that I wanted to make sure that the hole was perfectly aligned with the hole in the weldment. The only way to make 100% sure was to actually install the weldments (and bolt them).

Now that it is done, time to center the hole for the AN fitting and open to 5/8" diameter. So after some work with the file and the dremmel I had the opening at 5/8" and perfectly centered. 


Sunday, October 31, 2021

Touch-up proseal on side steps - 2 hours

 I need to touch up the proseal on the side steps. I do not want water to sit on the top of the side step flange, so the best solution is to have a good fillet of proseal on the top and sides of the side step. I don't enjoy working with proseal so lets just get this over with.


 I applied a health fillet of proseal around the side step. As well I used a syringe to get proseal tucked into the corners. 


 A bit of proseal as well along the bottom skin of the wing area.


 Then I bunch of cleanup with a rag and MEK. Yuck I hate this stuff.


Since I have a little time on my hands. I also installed all of the ends on the control rods and push tubes. I torqued all of the Jam nuts.

 UPDATE - Don't bother installing the control rod ends and jam nuts on the F-789 pushrod. In order to fit the rod into the fuse they must be removed and installed once the pushrod is slid into place.


Monday, October 25, 2021

Fabricating the F-789 Elevator push tube - 2.5 hours

 The last push tube to finish is the F-789 elevator push rod. Again I used Autocad to work out the rivet spacing 

The lines are marked on the tube, and drilled in the drill press. 

The same prime and paint process was used, and by the end of the evening I have the push tube primed and assembled and late evening I was able to spray a couple of coats of final color. 

During the day, a local builder Tracy Trathern who has a beautiful RV-7A dropped by to look in on the project. He also dropped of an ELT that he was selling. So I am now a proud owner of an Artex ELT 345. I will need to figure out how to mount this on my plane. 


Saturday, October 16, 2021

Installing the F-781attach plate and finished drilling the VS - 4 hours

 Started in this morning by preping and priming the F-781 attach plate. After about 3-4 hours of dry time, I decided it was good enough to rivet onto the VS. 


I started to open up the two upper #40 pilot holes in the VS rear spar. Now, here is the part that sucks. Unfortunately I cannot use a drill jig to drill these. Rather than completely disassemble and drill in the press or on the table with a drill jig. I choose to drill them by hand and ream to 3/16" in place. And the bolts are a tiny bit loose. Especially the right one. Crap


So talking to Vans Technical support, we determined that the best course of action is to use an NAS6603-4X bolt for this right hole. Its an 1/64" oversize and will allow me to hand ream the bolt for a perfect and snug fit. We also discussed using NAS close tolerance bolts for the left hole in lieu of the AN3 bolt as the NAS bolts are consistently just a couple thousandths larger in diameter than AN3 bolts and have a tenancy to snug up some of these areas where bolts easily slip into holes.

Moving onto the elevators, I need to start drilling the elevator horns. Fortunately I have not cut the ends of the HS stabilizer allowing for a prefect alignment of the elevators 


One item that I want to do is install nutplates in the elevator tips which will allow me the ability to install extra weight in the elevator tips if needed in future balancing. The existing tooling holes are perfect for an AN3 bolt.

Next I temporarily installed an elevator in the HS and now started to scratch my head on how best to drill the pivot hole. I need a 1/4" bushing to protect the bearing. A trip to home depot was a bust, however I stopped in at Hobby Wholesale and they have a whole selection of various brass tubes. Sure enough they have a 1/4" brass tube that will allow me to drill a pilot hole. 


Sunday, October 10, 2021

Fabricating and fitting the F-712D elevator stop - 4 hours

Looking around for the angle material for the F-712D and I just cant find AA6-125X1X1 1/4. However I have the same thickness material in a larger size. AA6-125X1 1/2X2 (Something like that) which was scrap from an early part of the fuselage build.  The angle will work just great as I can cut it down. The inside radius is a bit thicker, so in order to make it work I just need to increase the dimensions very slightly. 

I did a rough cut of the angle with exaggerated dimensions.  I will trim it down after I have drilled the mounting holes.

After marking and measuring everything. It was time to start drilling #40 pilot holes. 

Next I started opening up the holes for AN3 bolts. Stepping each one up #40 to #30, to #21 (Which allows a #8 screw for perfect alignment and "clecoing") and finally reamed to 3/16"


 Now its time to set the 1/4" offset on the vertical stab. Using lines I had previously drawn when setting the horizontal stabilizer. I can easily set the offset. But I just was hit with a huge crap. When trimming the VS-702 I set the proper height according to a straight VS. However...those measurements change when you begin the offset. I had good edge distance on the  F-781Vert. Stab attach plate, but as soon as I moved the 1/4" offset....nope. 

I dug out some 0.063" material that I have and cut out a new F-781Vert. Stab attach plate. I then moved all the rivet holes up about 3/16". Bent the plate between two pieces of oak and bingo bango. Done. 


 The drilling of the attach plate to the VS-702 is fairly easy after this. The front of the VS is aligned with the 1/4" left offset. A straight edge held to the hinges at the VS rear spar to set the proper height of the front of the VS. Clamp it all down and drill with the 90deg pneumatic drill.  

After that's done, I removed everything allowing good access to use a drill jig and upsize the attach plate/HS mounting holes to 3/16"


 In case you are wondering....I use a ton of washers during preliminary assembly so I don't use/abuse the nylon locknuts. I want to reuse the nuts for final installation and I feel much better about it when I know the nylon is "new and untouched"