Monday, January 21, 2019

Finishing up the F-705 Bulkhead - 2 hours

Tonight, I bolted the seatbelt anchors onto the bulkhead and torqued them. I also installed the nutplates on the side of the bulkhead (with NAS1097 rivets).

 Next I began to setup to drill the plastic flap bearing blocks. I installed both blocks on the bulkhead and measured each side to ensure that they were parallel.


Once I was sure that both were in the correct location, I clamped them and checked twice.


Once I was happy with the setup, I used the palm drill to start a pilot hole with the #12 bit. I then set up the drill press to complete the holes.

When finished drilling, on inspection. The holes didn't line up, the new hole seemed to be crooked. Really weird. It bugged me for quite a while, and then as soon as I put the blocks together....I figured out what happened.

The blocks from Vans are not cut straight at the factory...one block is at a slight angle when placed on a flat surface. So depending on how it sat when I drilled it....the holes were not going to be "Straight". Ugh...what a silly Gotcha. I will order a couple new flap blocks and drill it again. I will have to be careful to ensure that they are both straight to begin with before drilling.


Thursday, January 17, 2019

Finished riveting the F-705 bulkhead - 2 hours

Again, another small night on the build. Ugh....work gets in the way too much. I clamped the F-705 bulkhead to the table and finished squeezing the remaining AD4 rivets. Note that I did not attach the F-705F channel crosspiece as I am fitting the Anti-Splat Almost an RV14 mod during my build.


Wednesday, January 16, 2019

Started Riveting F-705 Bulkhead - 2 hours

I managed to squeeze in a small amount of work tonight. I began riveting the lower portion of the F-705 bulkhead. I decided to buck these rivets since with a proper setup, I have really good success setting straight and virtually perfect rivets. The pictures don't show it well, but I stand the bulkhead vertical and clamp it to the wood uprights on the edge of my table. I then have excellent access to buck all the rivets along the bottom.

All finished for the night, just will need to squeeze the rest as the material is too thin to buck the other rivets.


Sunday, January 13, 2019

Primed F-705 bulkhead parts - 2 hours

Work has been so awfully busy I just haven't had any time to get working on the fuse. Today I managed to get a little time in and I prep'd and primed the F-705 Bulkhead parts. 


Sunday, January 6, 2019

Started F-706/F-707 and F-708 Bulkheads - 7 hours

I started the day with digging out the F-706, 707 and 708 bulkhead parts. I began the work by fluting and trying to straighten all the pieces. The F-706 pieces are the worst offenders and are very warped and difficult to straighten. They are not perfectly flat, and at the advice of some local builders, there is little point in trying to make them perfect now as they will likely need more adjustment later when fitting the skins.


The tight corners need a fair amount of work as the tabs either touch or overlap. In the case of the 706 bulkhead they overlapped during forming so they really need work.


I see that some chose to cut these tabs down, while I choose to file them in order to preserve as much material as I could. I have a very small and thin file which I used to remove the conflicting material. I then re-rounded the tab corners and fixed what needed it. I broke all the edges and they are ready to 3M. Lots of time went into cleaning these up.
I drilled all the openings with the unibit for the rudder cables as well. I focused on the F-706B bulkhead. I see from everyone's build logs that the 5/8" holes in the center end up causing quite the issue with edge distances from the holes. After a bit of head scratching. I decided to reduce the hole size to 7/16". Since I am going with electric trim, there is no reason I see at this time to open up the holes to the maximum opening....so why do it. At 7/16" I can fit a smaller grommet for wiring and have tons of room for edge distance.


I really took my time and didn't rush the job and It turned out extremely well.
Next I moved onto the F-729A,B and C pieces. I soon found out that I must have cut too much of my 6' length of 0.63 angle so I don't have a 36" piece for 728B. Oh well, minor and its cheap to order more. I went to work on F-729C. Getting it bent to 88.5deg was quite easy. Just a light tap with the rubber mallet in the vice and it was enough.

Next I set up the pieces so I could fit and drill the 1/8" hole.


Looking good here. 

 I realized after the fact that the F-729B has edge distance issues on the aft end when I cut it per the dimensions in the plans. The angle needs to be a fair amount longer. I will have to re-do this piece as well. Not so good here. Edge distance on the last hole becomes a problem and there is lots of room till the flange. I will consider making the piece longer, and then rounding the end of the angle to fit the bend in the flange.


Saturday, January 5, 2019

Finishing up the F-706 Bulkhead - 6 hours

I took a couple days off from the build and took the kids skiing in the evenings as the weather has been quite nice. I also took a bit of time to read ahead in some of the build logs to get a better understanding of how all the pieces go together and some of the potential gotchas.

One of the things that I was dreading was drilling the wiring holes on the F-705A crossbar. There is not much room to fit these holes and maintain proper edge distance. Also opening up holes with the uni-bit isn't always as precise as I want it to be as the piece can wander if you are not really careful. First thing I like to do is mark-out my hole locations and also mark out the edge distance limits. I ended up deciding to modify Van's dimension slightly so the wiring holes are centered between the rivet holes. The small hash marks are minimum acceptable edge distance locations.

I set up the drill press and clamped a piece of oak as a guide. Slowly I opened up the holes.
  
Don't let the pictures fool you....this was a very slow and methodical process.

The holes are opened up and I am better than minimum edge distance on all 4 rivet holes. The worst offender seems to be the upper right and that one measures 0.2655" center to edge so we are in great shape.

I then opened up the 5/8" holes for the rudder cables.

Next I worked at trimming the two seatbelt anchors to clear the ribs. The pilot left side, and co-pilot right side need trimming. Again, this was a very slow and painful process for me as I took my time, measured, cut, fit, trim again, fit, trim again. Vans indicates minimum edge distance here is 2 x bolt diameter from the center of the hole to the edge. We have tons of room on the pilot side, however co-pilot side is a bit closer (but still within) edge limits. This is because Vans has you drill all four of the left side anchors to the dimension on the plans. I think a better way is to drill the left side anchors on the pilot side, and the right side anchors on the co-pilot side to the dimensions on the drawings first. Then backdrill the adjacent anchor. This would allow a perfect mirror, and the result is that both anchors have tons of edge distance room.

Next order of business is to drill the flap blocks. Took me some time to find where these were as I did not open the electric flap motor bag. I figured out that they are in that bag from reading Mike Bullocks build log. I inventoried all of the hardware and then set up for the drilling. (Funny, my blocks are different thicknesses, so I had to be careful when marking out my dimensions) The right block is clearly thicker.

Drilling in plastic like this is a bit tricky as the piece always wants to grab on to the drill bit. So I was sure to clamp everything down!

Next, since I didnt want to start in on a whole new piece this late in the evening. I opted to just tap the threads in the rear tie-down bar.


Wednesday, January 2, 2019

Still working on F-705 Bulkhead - 6 hours


Everything is rolling along nicely with the Bulkhead. I did some research into when I should incorporate the "Almost an RV14" seat mod from Antisplat Aero. Looks like everyone says during the build is a great time, seem I just don't need to rivet on the F-705F channel. I can just cleco it on for now and then replace it withe the seat mod when I get it.
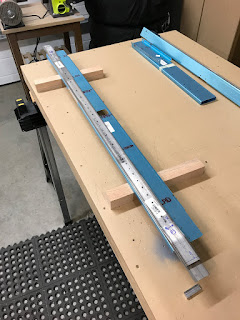
I need to drill the F-705H spacers in the rear spar fork. I scratched my head a bit about the best way to do this. I opted to eyeball it and drew a center line down the middle of the spacer. I then slipped it in the fork, lined it up and clamped it.


I then took my drill and very lightly started the hole to see if I was perfectly on center. Yup, all is good.

I drilled a little more by hand to start a proper pilot hole and finished the job on the drill press.

Next I marked out on the rear spar fork where the ends needed to be cut. I cut both F-705C and F-705B on a level platform on the bandsaw. I then found a level plane and finished the cut on the sanding station.

Perfectly aligned. I did check my measurement of the F-705B length and I am just a tad shy of the 45 3/32", I'm more closer to 45" maybe 45 1/32". I suppose by ensuring I had good 1/2" edge distance with that inboard hole, and then measuring out the 12 1/2" I may have tightened things up just a tad. Realistically we are only talking about 1/32" out on the ends.


Looking a Section H-H on drawing 38 I have a bit of wiggle room with that bolt location. I will be really good if most folks have to trim up the ends of the rear spar fork when they fit the wings. However if it is an area that most have trouble with it being short with anyway, I might find my options a bit more limited. I better check around to see what people have done during wing fitment.

Update Jan 4/18: I checked with Vans about the dimensions. Most ideal is to maintain 3/4" clearance (as noted in Section H-H) on all 4 sides. This dimension is not only from the end of the spar fork (that meets the wing) to the bolt, but also from the outboard end of the wing rear spar to the bolt. Vans noted that the rear spar should touch the spacer, so as long as the dimension from the spacer to the end of the spar fork is no less than 1.25" (5/8" min x 2) I am all good. 1.5" is optimal (3/4" x 2) and I sit at 1 9/16" so I am better than Optimal. 


I would be best to make a exact template of my rear spar to confirm the exact trimming dimensions of the rear spar. I'm a bit leery of those shown on Drawing 38. I don't want to trim too much of the rear spar.


Now I'm ready to trim down the F-605C doublers. 

Next step I am drilling the left side of the F-634 seat belt anchors. I marked out the location and set up a jig on the drill press. This way all of the left side seat anchors are drilled the same.
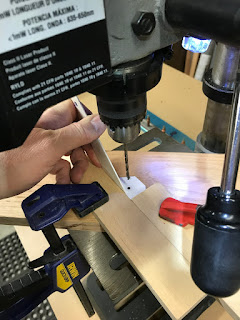
I had some spare .187" aluminum angle left over so I cut a spacer out of that to help get the best setup for drilling the right side of the anchors.

I bolted the spacer in between the anchors and fitted it to the assembly. Once I was happy with the square if the installation. I clamped everything down and back drilled the right anchor for a pilot hole. I then dissembled, and finished the right side anchors on the drill press. 

Super happy with how nice it turned out.