
Wednesday, February 17, 2016
Devinyled the right tank skin- 2 hours
Pretty mindless work. Its one of those jobs thats not totally necessary but it looks good and helps protect the work.


Sunday, February 14, 2016
Finishing Z-brackets....Almost - 4 hours
Now that I have given a day for the primer to dry, I can dive into setting rivets. I started by back riveting the stall warning access stiffener.

Then I set up the squeezer for setting the rivets on the z-brackets. I will say that these are a bit tricky as space is limited and you cannot get the rivet centered on the squeezer dies which in my opinion reduces your chances of getting well set rivet. I ended up having to drill out three rivets at the very start. Of course i'm rusty as I haven't squeezed rivets in a while, but I quickly picked it back up. In the end....I am short 4 nutplates. 3 were ruined when I had run a tap through them for drilling the nutplate attachment holes (I just didn't want to risk using those) and I threw out the 3 that I ended up drilling out. I found that they had a slight bow in them (after the first round of squeezing) so again, I didn't want to reuse them. I quickly placed an order to Aircraft Spruce for extra nutplates as well as 50 more AN3-4A bolts, washers, and nuts. (I do not plan to re-use any bolts or nuts after initial fitting in the off chance that I have over torqued them and compromised their structural integrity...and for a few cents a piece....why take that chance).


Setting the rivets for the inboard z-bracket took some head scratching. In hind sight I should have set these back when I was doing all the nutplates on the spar. I remember thinking then about doing these, but opted not to as all the other build sites and instructions left it for later. Doing it now presents some accessibility challenges. In the end I found that back-riveting them was the best way I could do it. I tried bucking them with a bar on the shop head side, but there is risk of damaging the spar doubler. Most of my back rivet sets have a thick plastic collar with the exception of my long 12" back rivet set from cleveland tools which has a thin plastic collar which allows me to get the tool into the nutplate. Using a bucking bar on top as a back-rivet stop, setting the rivets is fairly easy.


Then I set up the squeezer for setting the rivets on the z-brackets. I will say that these are a bit tricky as space is limited and you cannot get the rivet centered on the squeezer dies which in my opinion reduces your chances of getting well set rivet. I ended up having to drill out three rivets at the very start. Of course i'm rusty as I haven't squeezed rivets in a while, but I quickly picked it back up. In the end....I am short 4 nutplates. 3 were ruined when I had run a tap through them for drilling the nutplate attachment holes (I just didn't want to risk using those) and I threw out the 3 that I ended up drilling out. I found that they had a slight bow in them (after the first round of squeezing) so again, I didn't want to reuse them. I quickly placed an order to Aircraft Spruce for extra nutplates as well as 50 more AN3-4A bolts, washers, and nuts. (I do not plan to re-use any bolts or nuts after initial fitting in the off chance that I have over torqued them and compromised their structural integrity...and for a few cents a piece....why take that chance).


Setting the rivets for the inboard z-bracket took some head scratching. In hind sight I should have set these back when I was doing all the nutplates on the spar. I remember thinking then about doing these, but opted not to as all the other build sites and instructions left it for later. Doing it now presents some accessibility challenges. In the end I found that back-riveting them was the best way I could do it. I tried bucking them with a bar on the shop head side, but there is risk of damaging the spar doubler. Most of my back rivet sets have a thick plastic collar with the exception of my long 12" back rivet set from cleveland tools which has a thin plastic collar which allows me to get the tool into the nutplate. Using a bucking bar on top as a back-rivet stop, setting the rivets is fairly easy.


Saturday, February 13, 2016
Countersinking nutplates and priming z-brackets - 4 hours
I finished drilling the last few nutplate attachment holes on the z-brackets. I de-burred all of the holes. So far so good.

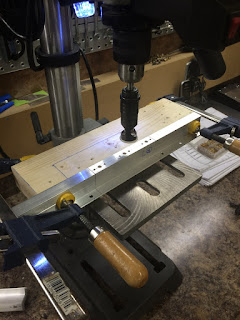
Looking at the countersinking of the z-brackets, I am always concerned with properly supporting the material and the countersink cage so not to cut too deep. I have ruined too many parts but accidentally countersinking too deep all because part of the countersink cage was not properly supported. The solution was to set up a sort of jig on the drill press. I clamped the inboard z-brackets on either side of the z-bracket I was countersinking on a scrap piece of 2x4. I set the countersink depth for a NAS1097 'OOPS' rivet. Those two attachment holes at each end are fairly close to the edge and I wanted to reduce the amount of material being removed there, so after some research on oops rivets on Vans Airforce, I decided that the use was acceptable in this application. Again....This setup worked extremely well.
The next step was to round the sharp 90degree outside corners of the flange (not the web). I used the sanding station with 400 grit paper to get the rough cut done and finished all edges on the fine 3M wheel. Then each piece was washed with dawn soap and scotchbrite, rinsed, wax and grease remover, MEK'd, re-labelled with sharpie and then primed. I also primed the stall warning stiffner.


Looking at the countersinking of the z-brackets, I am always concerned with properly supporting the material and the countersink cage so not to cut too deep. I have ruined too many parts but accidentally countersinking too deep all because part of the countersink cage was not properly supported. The solution was to set up a sort of jig on the drill press. I clamped the inboard z-brackets on either side of the z-bracket I was countersinking on a scrap piece of 2x4. I set the countersink depth for a NAS1097 'OOPS' rivet. Those two attachment holes at each end are fairly close to the edge and I wanted to reduce the amount of material being removed there, so after some research on oops rivets on Vans Airforce, I decided that the use was acceptable in this application. Again....This setup worked extremely well.

The next step was to round the sharp 90degree outside corners of the flange (not the web). I used the sanding station with 400 grit paper to get the rough cut done and finished all edges on the fine 3M wheel. Then each piece was washed with dawn soap and scotchbrite, rinsed, wax and grease remover, MEK'd, re-labelled with sharpie and then primed. I also primed the stall warning stiffner.


Thursday, February 11, 2016
Drilling nutplates for z-brackets - 2 hours
I started drilling the z-brackets for the nutplates. I quickly figured out that I do not have a nut plate jig that works for the AN3 bolt. I have access to a friends Brown Tools 12 piece nut plate kit and nothing in there worked. The AN3 bolt is a 10-32 size, so I dug into my nuts and bolts collection and found 10-32 X 3/8" machine screws. Tried it in the nut plate and it was perfect. Bit too tight. So i got out the 10-32 tap and ran a tap through 3 nut plates. Now the screws go in nice and smooth.

I installed 3 nutplates on a given z-bracket and carefully lined up the rivet attachment holes with the line I had originally drawn.

Then tightened the screws. Once everything was set, I placed the assembly under the drill press and drilled the holes with #40. This process takes some time to set up but it worked extremely well. The nut plate attachment holes came out perfect and precise.
I got through about 3/4 of the z-brackets

I installed 3 nutplates on a given z-bracket and carefully lined up the rivet attachment holes with the line I had originally drawn.

Then tightened the screws. Once everything was set, I placed the assembly under the drill press and drilled the holes with #40. This process takes some time to set up but it worked extremely well. The nut plate attachment holes came out perfect and precise.
I got through about 3/4 of the z-brackets
Wednesday, February 10, 2016
Finished drilling z-brackets to spar - 2.5 hours
I really didn't have motivation to work today, but I forced myself out into the garage. Better to get a little bit done than nothing.
I clamped the z-brackets down on the accessible edge and then started to drill the holes to #12 for the AN3 bolt.

I used a piece of 1 1/2" 1 1/2" oak as a poor mans drill guide. The oak piece has a couple of holes drilled with a #12 hole.

It does a good job of ensuring the hand drill hole is straight and perpendicular to the surface, however it is a tad tricky to work with as you have a tenancy to add some side pressure to the bit with it when drilling like you do in this application. Two holes in the spar web ended up being ever so slightly oblong. (Left wing top holes #6 and #7 bracket) Not as nice as I wanted but it will be ok. From my research on the oblong hole I had with my tie down spacer this one is not a big deal and no cause for alarm.
(I really hate drilling through thick material with a hand drill though. Nothing beats a good ol' drill press for precise holes).
After drilling was complete, I then removed all of the z-brackets to blow out the loose chips from drilling. It's good that I did this step as chips do manage to find their way under the bracket.

I clamped the z-brackets down on the accessible edge and then started to drill the holes to #12 for the AN3 bolt.

I used a piece of 1 1/2" 1 1/2" oak as a poor mans drill guide. The oak piece has a couple of holes drilled with a #12 hole.

It does a good job of ensuring the hand drill hole is straight and perpendicular to the surface, however it is a tad tricky to work with as you have a tenancy to add some side pressure to the bit with it when drilling like you do in this application. Two holes in the spar web ended up being ever so slightly oblong. (Left wing top holes #6 and #7 bracket) Not as nice as I wanted but it will be ok. From my research on the oblong hole I had with my tie down spacer this one is not a big deal and no cause for alarm.
(I really hate drilling through thick material with a hand drill though. Nothing beats a good ol' drill press for precise holes).
After drilling was complete, I then removed all of the z-brackets to blow out the loose chips from drilling. It's good that I did this step as chips do manage to find their way under the bracket.

Another Shipment of Tools and Goodies
I had ordered a few supplies from Aircraft Spruce in anticipation of doing the fuel tanks. Polywipes...At the recommendation of an aircraft mechanic friend, he swore by these. They are like baby wipes but with polygone gel on them. He said they are great for working with proseal as they make cleanup a snap! He says you can grab a wipe with proseal all over your gloves and clean them off, clean tools and keep going.

I also ordered 30 3/32" and 20 1/8" stubby clecos. I just love em for those tight spaces!!!

I also ordered 30 3/32" and 20 1/8" stubby clecos. I just love em for those tight spaces!!!
Tuesday, February 9, 2016
Marking out and drilling Z-brackets - 4 hours
I dove into laying out the center lines on the z-brackets and quickly figured out that if I set the offset 1/16" from the center line, it placed the shoulder of the nutplate into the radius of the corner between the flange and web of the bracket. After taking measurements and drawing it up on AutoCAD. I decided to reduce the offset to 1/32". We are not taking about big distances here, but with these pieces I feel much more comfortable. Seems that this 1/32" distance vs 1/16" is similar to those observed by Mike Bullock in his blog...he too found that the larger offset distance places the nutplate quite close to the web.
This is how things line up with the 1/32" offset from centerline. (Blue is the AN3 bolt. Magenta is the nutplate).

So...Here is the revised isometric view showing the corrected 1/32" dimension.

Once I had my dimensions all worked out, I marked all the z-brackets out. Then, very carefully i used a center punch and marked the first hole location.


Once all the brackets where marked I set up the drill press and a drill jig, and drilled the first holes with a #50 bit. Then I opened them up to #40. After that...#12.


I bolted the brackets to the spar using AN3-4A bolts, washers and nuts. I snugged them up and then squared each one up to the spar. Using a thin sharpie I marked the edge on the spar as a reference.


All done. Ready to match drill more holes.

This is how things line up with the 1/32" offset from centerline. (Blue is the AN3 bolt. Magenta is the nutplate).

So...Here is the revised isometric view showing the corrected 1/32" dimension.

Once I had my dimensions all worked out, I marked all the z-brackets out. Then, very carefully i used a center punch and marked the first hole location.


Once all the brackets where marked I set up the drill press and a drill jig, and drilled the first holes with a #50 bit. Then I opened them up to #40. After that...#12.


I bolted the brackets to the spar using AN3-4A bolts, washers and nuts. I snugged them up and then squared each one up to the spar. Using a thin sharpie I marked the edge on the spar as a reference.


All done. Ready to match drill more holes.

Subscribe to:
Posts (Atom)